


Extruder
Extrusion is a forming process widely used in the plastics industry and the main process in mechanical recycling.
1. General overview
1.1. Introduction
Extrusion is a process used in industry to obtain various sections of great lengths such as profiles or line pipes.
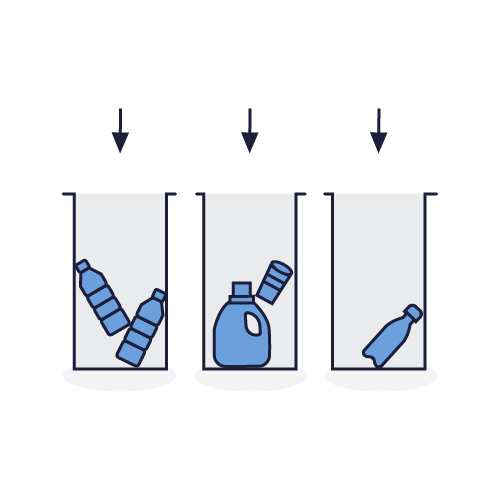
The purpose of the extruder is to continuously process plastic granulate. This process involves heating and gradually mixing the plastic material to form a malleable paste that emerges from the extruder with a defined profile. Without stopping, this profile is then cooled and then trimmed to create long sections of recycled plastic.
How the extruder works?
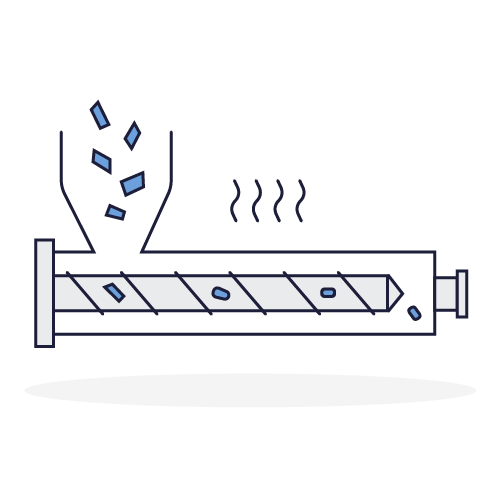
The plastic granulate is introduced into a hopper and falls, by gravity, into a horizontal cylinder called a barrel, heated throughout by heating resistors. Inside the barrel, a screw spins and pushes the plastic to the outlet of the barrel through a shape called a die.
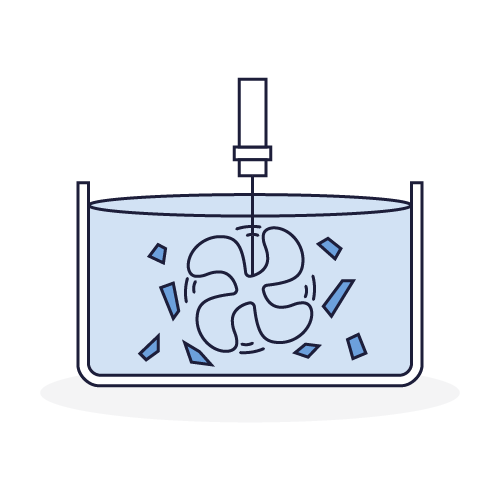
The action of the screw and the heat melt and mix the plastic chips to obtain a viscous and malleable paste.
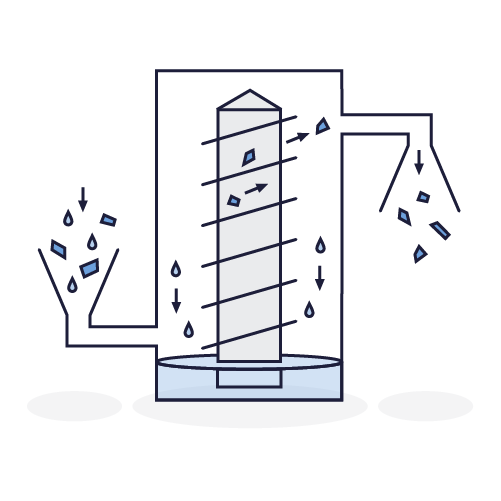
The die located at the end of the barrel gives shape to this viscous paste, thus producing parts whose length can be very varied and interchangeable.
1.2. The extruder on board the Plastic Odyssey
The on-board extruder was recovered and adapted for our use in the Plastic Odyssey workshop in Marseille. It was previously used to supply industrial pyrolysis, so its use was quite complex to operate because it was controlled by very precise control circuits. We replaced the controls with simple on and off buttons to make it easier and more accessible to use.
This extruder has the advantage of being robust, easy to use, and its size allows it to ingest many types of plastics efficiently.
We have also adapted its use. On board the ship, we have limited space and limited power supply, constraints that can often be found in areas affected by plastic pollution. The extruder can perform the role of several machines. It is able to produce both long profiles but also to be used in combination with a hydraulic press and/or molds. It then performs the role of an injection molding machine. We can thus produce recycled plastic objects using a variety of techniques with just one easy-to-use machine for processing the plastic.
2. Technical guide
2.1 Technical datasheet
General characteristics
Motorisation
Process
Economic and environmental
Manufacturing
2.2. Connections and Sockets
Network Connections
Sockets
3. User guide
3.1. Preparation
Mandatory protection:

Protective gloves

Safety shoes

Protective gloves

Safety glasses
Necessary Equipment:
- Thermal gloves
- A metal spatula
- Bucket
- A shaping form (mold, die, barrel)
Good practices:
- Adjust the temperature according to the material to be extruded
Verification
Before any use, visually check the mechanical condition. Periodically check the condition of the equipment (see maintenance sheet).
3.2. Usage

- Switch on the electrical control panel

- Set the temperature according to the material to be extruded

- Pour the shredded plastic into the hopper

- Install the shaper

When the temperature of the heat bands is reached:
- Start the motor by pressing the RUN button on the drive
- Gradually increase engine speed (1)

In the case of using the barrel as a form:
- Fill the profiles
Optimal tuning of the extrusion process can take time. During the adjustment phase, the extruded material should be shaped as much as possible to then facilitate its recycling.

Shutdown procedure:
- Empty and clean the hopper
- Purge the barrel
- Cut the motor power supply using the STOP button
- Turn off heat bands
4. Safety
4.1. Training
The operators who interact with the extruder must be aware of and respect the information relating to the use of the machine, the risks of using the machine, and the appropriate safety practices.
4.2. Risks
- Winding / entanglement of clothes or objects due to the rotating system
- Burns from heating elements and molten plastic
- Poisoning due to vapors from molten plastics
- Cuts due to handling rough chips
4.3. Operator behavior
- Do not touch high temperature components (heating collars, sleeve, nozzle)
- Do not put your hands in the hopper when the engine is running
4.4. Personal protective equipment
- Safety shoes are compulsory throughout the workshop and around all the machines.
- The operator has to handle plastic chips which can be rough, protective gloves are therefore mandatory to handle the chips safely.
- The extruder includes heating elements, thermal gloves allow these elements to be handled with reduced risk.
- Small pieces of plastic can occasionally be thrown from the hopper, protective goggles should be worn to protect the eyes from this splash.
- Molten plastic can give off toxic fumes. In the event of poor ventilation, the operator should wear an FFP3 mask.
- The operator must wear suitable work clothes.
4.5. Safety features
Safety Features ensure the safety of operators on the extruder. Make sure they are correctly installed before use:
- The belt protection guard is correctly positioned and secured.
- Fumes may emerge at the outlet of the extrusion nozzle. Exhaust ventilation is necessary to capture these fumes and filter them.
4.6. Work zone
A work zone around the machine is defined by a marking on the ground.
Access near the machine, whilst it is in operation, is permitted only to trained and equipped operators.
4.7. Jobsite information Sheet
The shredder is equipped with a Jobsite Information Sheet which includes all the information necessary for the use of the machine in good safety conditions. It must be positioned in view of all operators using the shredder.
4.8. Verification/Maintenance
Preventive and corrective maintenance activities must only be carried out by a person trained for this purpose. Each intervention must be recorded in order to keep a history of the maintenance actions carried out.
5. Cleaning and Maintenance
5.1. Maintenance schedule
Day to day
Weekly
Monthly
Yearly
5.2. Cleaning schedule
Day to day
Weekly
Monthly
Yearly
5.3. Intervention protocol
Before carrying out any maintenance, adjustment or repair intervention requiring partial or complete dismantling of parts of the, it is necessary to follow these protocols.
Electrical
- Set the power button to Off
- Activate the emergency stop button, and if accessible, switch off the main power
- Mechanically block the power button with a padlock
- Check the absence of voltage on each of the active conductors (including the neutral) using a specially designed VAT device.
Mechanical
- Wait for the rotors and fans to come to a complete stop
- Uncouple the belts
- Mechanically block the feed screw and the main motor
- Visually check for dissipation of motor force and immobilization of moving parts
